In life, love, and fashion, things come and go! You might think as trends go in and out, your shooting style should adapt and rise up to meet them. Well, sorry to burst your proverbial bubble, but that’s not the case when it comes to the fundamentals of clothing photography. In most cases, these are often fashion photography mistakes you weren’t even aware you were making.
We’re taking a look at the top six fashion photography mistakes, and what you can do to make sure you rid them from your life once and for all.
Mistake #1: Neglecting Garment Prep
In the morning before work, so often we grab a slice of toast in one hand, a cuppa in the other, all the while furiously trying to pull on a little black dress (LBD). As your running out the front door, you catch a quick glance in the mirror and find your dress is full of creases. But it’s too late, you have a job to get to, and you’ll just have to make it work.
But for fashion photographers making sure that LBD looks its absolute best is your job! There are no shortcuts or quick measures that will savage a creased or tattered looking garment. No matter what you do garments will get creased, it’s that simple. You need to ensure you have the tools and time to prep your clothing, so it looks it’s best when it’s in under the spotlight!
To make sure you avoid being guilty of one of the simplest fashion photography mistakes, steam or iron all your garments in advance, bring a mini styling toolkit with you to set, and remove unwanted dust with a trusty lint roller.
Garment Prep Top Tip
Examine the article of clothing from top to bottom, inside and out. Look for any loose strands of thread, stickers, dust, hair and keep a set of garment prep tools on you at all times for last-minute fixes. And, trust me when I tell you, there’s no such thing as too many lint rollers.
Mistake #2: Hanger, Mannequin or Model?
You’ve probably heard someone say, “It looks better on than it looks on the hanger.” That’s because it’s the truth – plain and simple! So often photographers will lay out a garment of clothing on a white background or use a hanger on a rail. While that might be enough to get the job done, is it enough when it comes to showcasing new inventory in the best possible light?
You’ll notice most online fashion sites use models to show off their outfits. As an online shopper, one of the primary disadvantages is not knowing how it will look, fit and suit you before you place your order. As an online seller, you need to consider that your website is a window into your store. Just like shopping on the high street, enticing window displays have proven time and time again that they directly increase sales. Consider your product photos as your virtual window display.
Every online store is obliged to ensure that their product photos are inviting, engaging and stimulate the creativity and imagination of online shoppers. A little advice, there’s no need to hire the hottest model to strut your range either. Consider who your target market is, or if they’re of a certain age and size. Perhaps a size zero blonde bombshell might not represent your ideal customer.
Take a look at Fashion Nova.They are well known for celebrating and embracing women of all shapes and sizes. They know exactly who their audience is, and with a legion of celebrity fans and millions of social media followers, it looks like they’ve got it figured out.
If you think that models are too expensive, then think again. Everyone knows someone who is comfortable in front of the camera, and for those who don’t then you won’t have to spend much to get a mannequin. They’re just as flattering, plus they have the added advantage of allowing you to pin and tuck as much as you want to get the desired outcome.

Sources: garmentory.com & lystit.com
Hanger, Mannequin or Model Top Tip
Don’t be afraid to ask friends and family to model for you. We’re living in a society where the word selfie is officially in the dictionary. I’m pretty sure you’ll be able to find someone who’s not averse to having their photo taken. Using a hanger should always be the absolute last resort. An online shopper doesn’t want to know what it’s going to look like on a hanger. Chances are they’re going to want to wear their new purchase. Give your garment a head start with photos that best represent the clothes.
Mistake #3: Limited Product Images
Of all the fashion photography mistakes, this has got to be the most unforgivable. I know they say all things in moderation, but this rule doesn’t apply to product photos. And certainly doesn’t apply to fashion. Fashion photography is one occasion where less is definitely not more. Just when you think you’ve added enough photos, add one more for good measure. Creating the ultimate shopping experience should be your top priority when shooting fashion photos.
Think about the last time you were trying on an outfit in a changing room. How many mirrors did they have? What was the lighting like? Did you get a good 360-degree view of the outfit? How many angles did you attempt to get a full view? Did you take a couple of selfies? Now, think about the fact that online shoppers don’t get that luxury when buying clothing from a website. It’s up to you to take that in-store experience and translate it online.
Most eCommerce sites allow between 9 and 12 images per item. While that may seem a bit excessive, when you start showcasing different angles, material close-ups and zooming in on finer details, you’ll be wishing there was room for more!
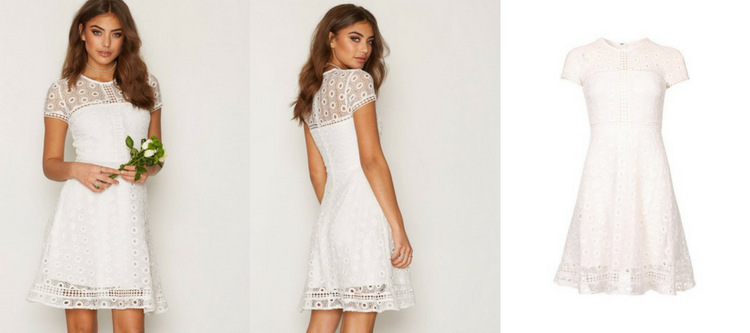
Source: Nelly
Limited Product Images Top Tip
Always choose your best front facing picture as your hero image. Your hero image should be your rockstar photo. It’s the first thumbnail that online shoppers see before they decide whether they want to look at more pictures. Include sizing charts in your set of images; this will increase customer confidence in parting with their cash. Over 50% of returns are down to poor sizing, and handling returns is a significant drain on time and resources. A combination of multiple images and a sizing chart is a great way to reduce returns.
Mistake #4: Poor Lighting
How many times have you looked through an online catalog only to find yourself squinting as you try to decide if you like the garment or not? I often find myself desperately clicking the zoom button just to figure out what type of material an item is made of, if it’s shiny or matte or if it’s black or charcoal grey. These are the kind of details that every online shopper wants to know before making a purchase.
Lighting mistakes are more common than you might think. To the naked eye, you can see everything clearly, but it’s a different story when a take a photo without the right lighting. It will look like you decided to do a photoshoot in the dead of night, with nothing but a ceiling light.
When shooting fashion photography, each item is slightly different when it comes to finding the best lighting to showcase the garment properly. Natural light is always your best friend because it lends the best quality to your image. Steer clear of any poor light, shadows and dark shadows where the lighting is going to ruin the quality of your image.
There are an abundance of filters and Photoshop techniques that can assist when overexposure and underexposure raise their ugly heads. But any photographer will tell you that the best raw image edited will always beat a poorly photoshopped one. Lighting is critical in a photographers’ world, and where clothing photography is concerned, it’s absolutely non-negotiable.
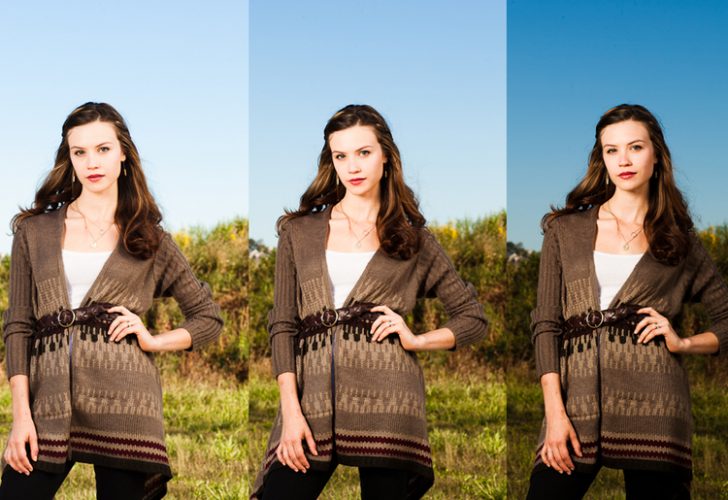
Source: zachandjody.com
Poor Lighting Top Tip
When it comes to lighting, nothing beats natural lighting. The goal of artificial lighting is to recreate the effect that natural lighting achieves. Unfortunately, natural light can be highly unpredictable, inconsistent, and difficult to harness. A few key things to think about when shooting fashion photography using natural lighting; shoot when natural light is at its brightest. Ideally at ‘the golden hour’ (either before the sunset or just after sunrise) as this will give a beautiful warm, soft finish. And always take into consideration which way the natural light is facing, as this will make a huge difference in the overall finished photo.
Mistake #5: Incorrect Camera Settings
If you have experience taking photos using a professional camera, then you’re probably already pretty comfortable with the multitude of settings. For anyone just starting out in their amateur product photography adventure, getting used to the various settings can a bit overwhelming.
Just like lighting, understanding the right combination of camera settings will come with practice. Before you get started, I’d suggest you check out some videos on YouTube. Pay particular attention to videos explaining ISO, aperture and white balance. These are the three most fundamental settings when shooting with a high-quality camera.
1. ISO
ISO is responsible for the clarity and sharpness of your photos. If the ISO setting is too high, you’ll produce grainy images, so be sure to keep it under 600-640.
2. Aperture
Aperture refers to the amount of focus given to certain parts of your photo. On your camera, you’ll find the button in the form of an ‘f’ with many settings. When the aperture is higher more aspects of the image will be in focus. As a general rule, keep your aperture higher than f/11.
3. White Balance
If in doubt – choose Auto! That way the camera will decide how much white balance the photo needs, based on the light source you’re using. Some colors are warm while others are much cooler, and controlling white balance will allow the images to reflect as close to the actual color as possible.
Incorrect Camera Settings Top Tip
Mistake #6: Attention to Detail During Editing
Our final fashion photography mistake is something that is very dear to our hearts – editing. Having worked with thousands of eCommerce sellers and edited millions of product photos, I think it’s safe to say we know a thing or two about what it takes to achieve perfectly edited product photos.
If there’s one thing you take from this post it’s this; make sure you maintain consistency across all your photos. After you’ve gone to the trouble of tackling lighting and camera settings, you want to make sure you don’t fall at the last hurdle. Consistent product photos help elevate your brand and portray a sense of professionalism.
If you decide to use a background color on your images, make sure they’re all consistent. Find a photography style what works well for your brand, and create a template, so future photos are consistent.
Here are a few quick tips for editing:
1. Alignment
Use rule guides to ensure your product photos are perfectly aligned. Make sure your product is dead center, every image has the same amount of white space around the sides and sizing is consistent.
2. Backgrounds
We highly recommend you use a white background for all your product photos, as this allows the garment to be the star attraction. But, whether you’re shooting against a white background or in context shots, keep it consistent and avoid backgrounds that steal the attention away from your garment.
3. Colors
The last thing you want is a customer returning an article of clothing because what she thought was a maroon dress, turns out to be brown. We’ve all been that customer, and the process of having to return an item is very inconvenient. Make sure you take the time to go through your every photo to make sure that the colors are accurately represented.
Attention to Detail During Editing Top Tip
Whether you’re just looking to remove the background, or something a bit more complicated like add reflections and drop shadows, it’ll take a bit of practice. Photoshop is your best friend, once you get used to it. There are also lots of really cool free and paid photo editing apps that’ll make the job a whole lot easier.
As a busy entrepreneur, you need to decide where you’re time is best spent. By understanding out where you bring the most value to your business, you’ll be able to focus on growing your company. Spending hours getting to grips with the intricacies of editing photos might not be a good use of your time. Why not use an automated system that can get your photos looking picture-perfect within minutes? Upload a free trial photo and see for yourself.
Guilty of any of these fashion photography mistakes?
So, how did you do? As an eCommerce entrepreneur, it’s easy to overlook some of the basics when you’re drowning in a never-ending sea of tasks. Each one requiring your immediate attention.
But, you need to remind yourself that product photos are your number one selling tool. Poor product photos are the difference between success and failure, particularly when it comes to fashion.
Recreating an in-store experience online is a tall order at the best of times, so don’t sell yourself short by neglecting to showcase your beautiful garments in all their glory.
The fact that you’ve chosen to run a business in the most crowded sector of eCommerce shows that you’re passionate. Inject that passion and creativity into your photos, and you won’t regret it.
As for the tedious task of editing, why not try an automated system to do that instantly for you. For less than the price of a cup of coffee, we’ll have your product photos edited within minutes. Why don’t you upload your free trial today?