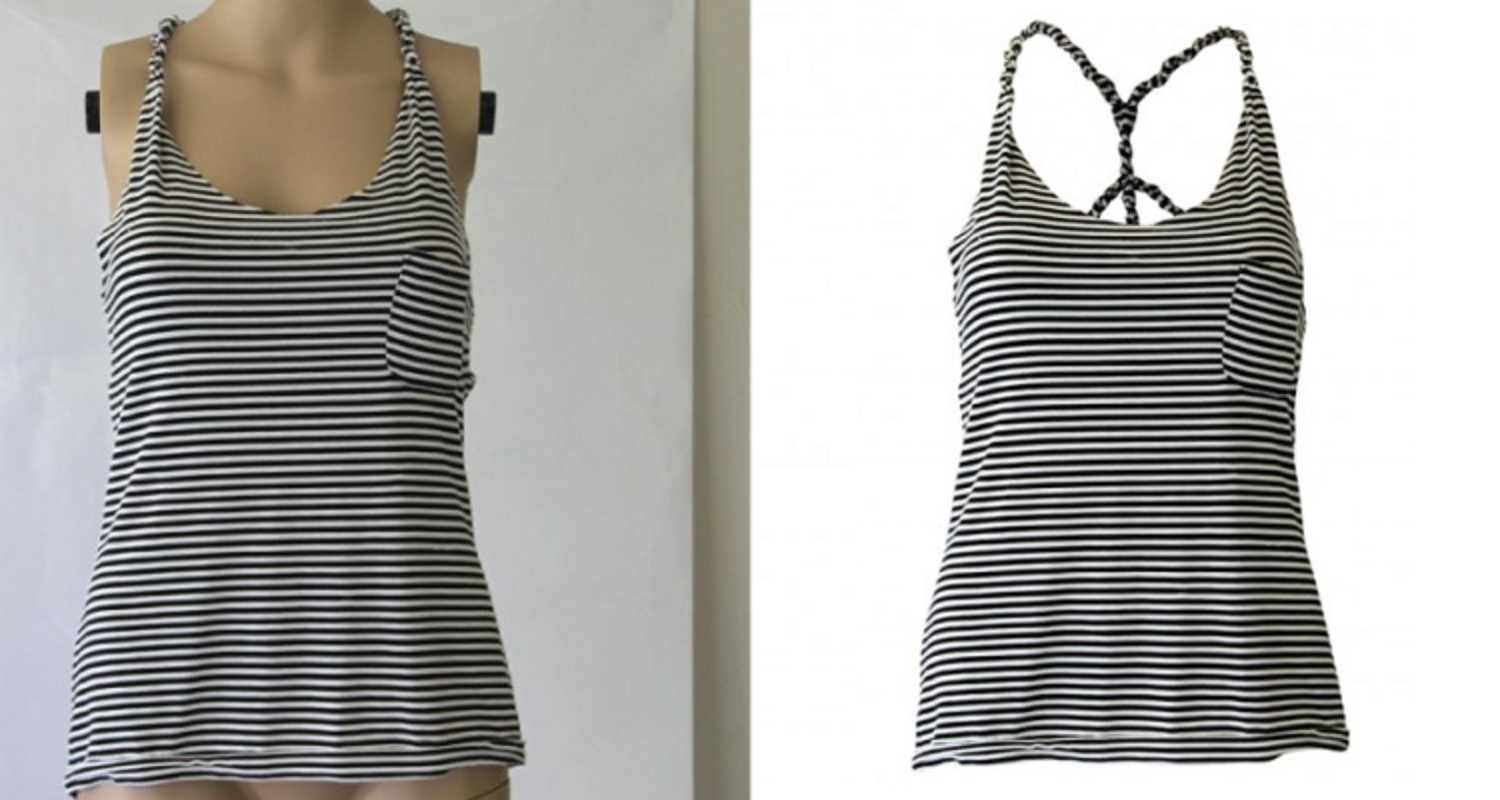
A while ago, we suggested that you bring your products to life with a ghost mannequin effect.
A ghost mannequin effect gives a product dimension and shows parts of the product that would otherwise be obscured by a mannequin or model in a single shot.
In a nutshell, it’s an easy way to give your ecommerce store a professional touch and makes it a lot easier for potential customers to visualize products in their minds.
In this article, I’m going to walk you through the process of setting up your shoot, capturing the right photos, and editing your photos in Adobe Photoshop to produce the ghost mannequin effect.
By the end of this blog post, you’ll know exactly how to capture photos that make it look as though your clothes are floating on an invisible body.
Let’s get started!
Step 1: Choose a mannequin
The first thing you need to do is prepare your studio for the shoot.
First, make sure you have a good-quality mannequin. You can use a model, but a mannequin will give you the most consistent photos.
Even if you use the same model for all your products, it’s not easy to shoot them standing in the exact same position every time.
You also need to remember that for a ghost mannequin effect you must digitally stitch two shots together.
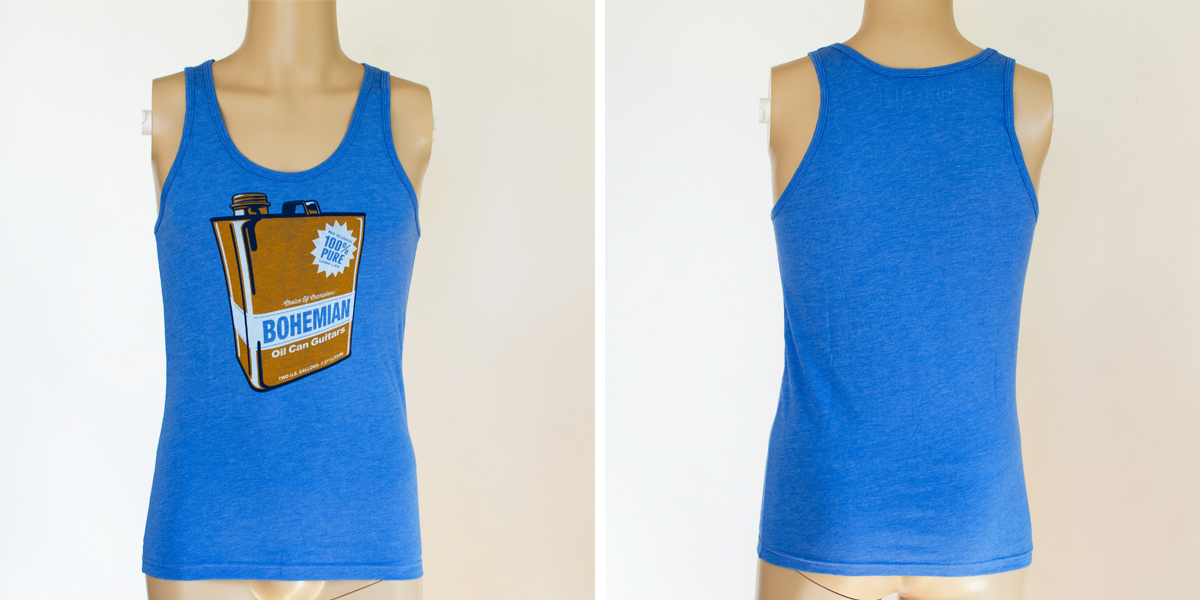
Start with a mannequin that stands straight.
Mannequins come in all different poses so traditional brick-and-mortar stores can mix it up, but when you remove the background behind a mannequin with its hip out and one of its arms bent, your photo is going to look strange and unnatural.
Also, if your product has sleeves, you’ll need a mannequin with arms or you’ll end up with a strange-looking product image. That is, the torso will have that 3D look but the arms will be dangling awkwardly by its side.
If you’re taking photos of shirts or jackets, it helps to have a translucent stand to mount the bust on so you can see the drape of the rear hem in the first image you take. This will help you align things in Photoshop during the editing stage.
Step 2: Set up your studio
Set up a white backdrop.
This will help ensure the clothing colors aren’t overexposed and that each one remains true to the color of the actual product.
The white will reflect light back onto your image and keep your camera’s white balance calibration accurate. It also makes it much easier to remove the background later in Photoshop.
Use a tripod to position your camera in a steady, consistent position.
Shoot all of your tops together, then shoot your bottoms, and finally shoot your ‘full body’ outfits to make the process more efficient.
Ideally, you want the camera positioned so the entire frame is filled by the white backdrop and the product.
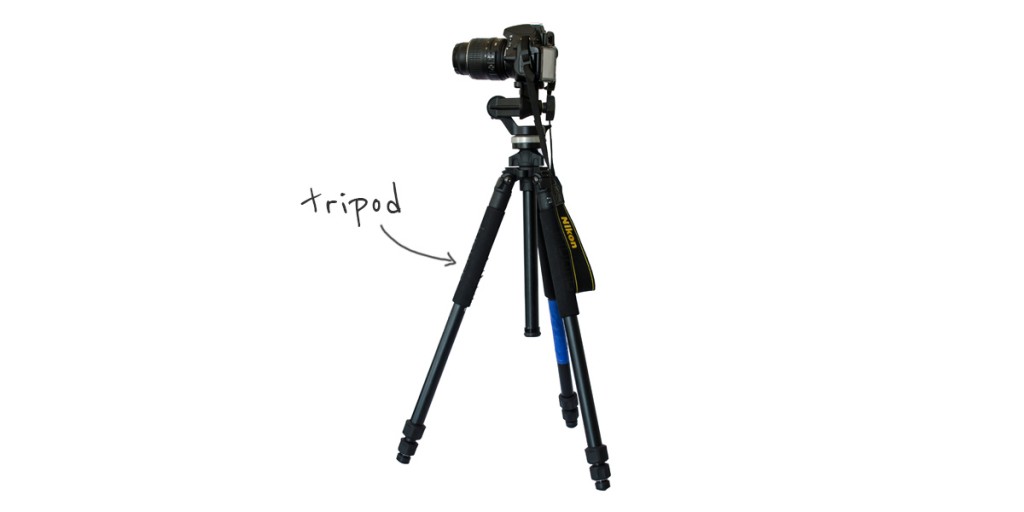
Make sure the lighting is sufficient to show off your product.
If you’re using natural lighting, check out our post on how to use natural lighting for product photography for some quick tips. If you’re using artificial lighting, review these tips on our blog about building your product photography studio on a budget.
Finally, get that mannequin ready!
Position it at least five feet away from the backdrop so your final image is very clear and evenly lit.
When you dress the mannequin, make sure you take the time to check for creases, smudges, and stains.
Though you can always edit these later, it’s easier to have a wet cloth and iron ready to save you the trouble. Also, having an extra pair of hands when dressing the mannequin will help; adjusting the arms and clothes while holding it up can be challenging.
Step 3: Take your photos
The first step is simple: take a picture of the front of the garment, with the front of the mannequin facing the camera.
The second step is a bit trickier.
Take off the garment, turn your mannequin around so that the back of it is facing the camera and then dress the mannequin again — but this time the garment needs to be inside out.
The reason you’re doing this is so you can get a clear view of the tag area (behind the neck or waist), as well as the lower back of the hem.
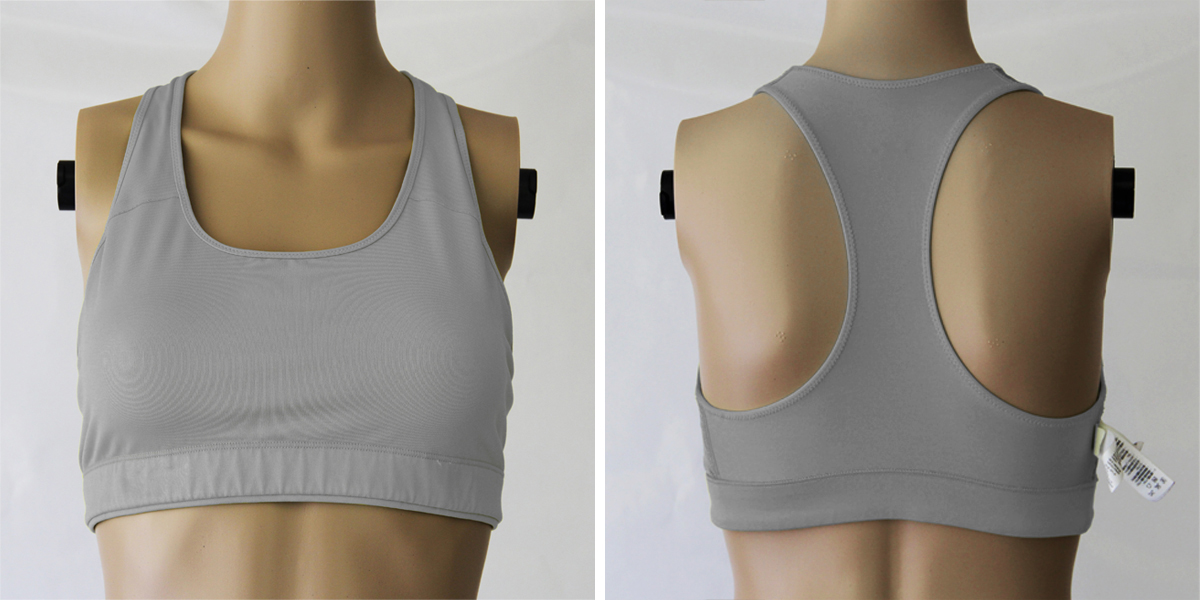
Take this second photo with the same settings as the first, and without moving the camera. This is why you should use a tripod, and why a mannequin works better than a model. It’s worth taking some time here to be precise when rotating the product exactly 180 degrees, otherwise, it’ll be harder to digitally stitch the halves together.
You can follow this same process for a rear view of any garment; just flip the directions around.
Take a photo of the back of the mannequin with the product the right way around, and the front of the mannequin with the product inside out.
You won’t need to do this if the back of your product is longer/wider than the front in all places, as there won’t be a difference between a simple shot of the product’s back and a ghost image of the product’s back.
After taking the photos, we have to head into editing to stick these parts together.
Step 4: Edit to create a ghost mannequin effect
Import your images to your computer and open up Photoshop, then follow these steps:
1. Open the image of the ‘front half’ in Photoshop.
Make sure your ‘Layers’ panel is open; you will see that your image makes up the locked background layer.
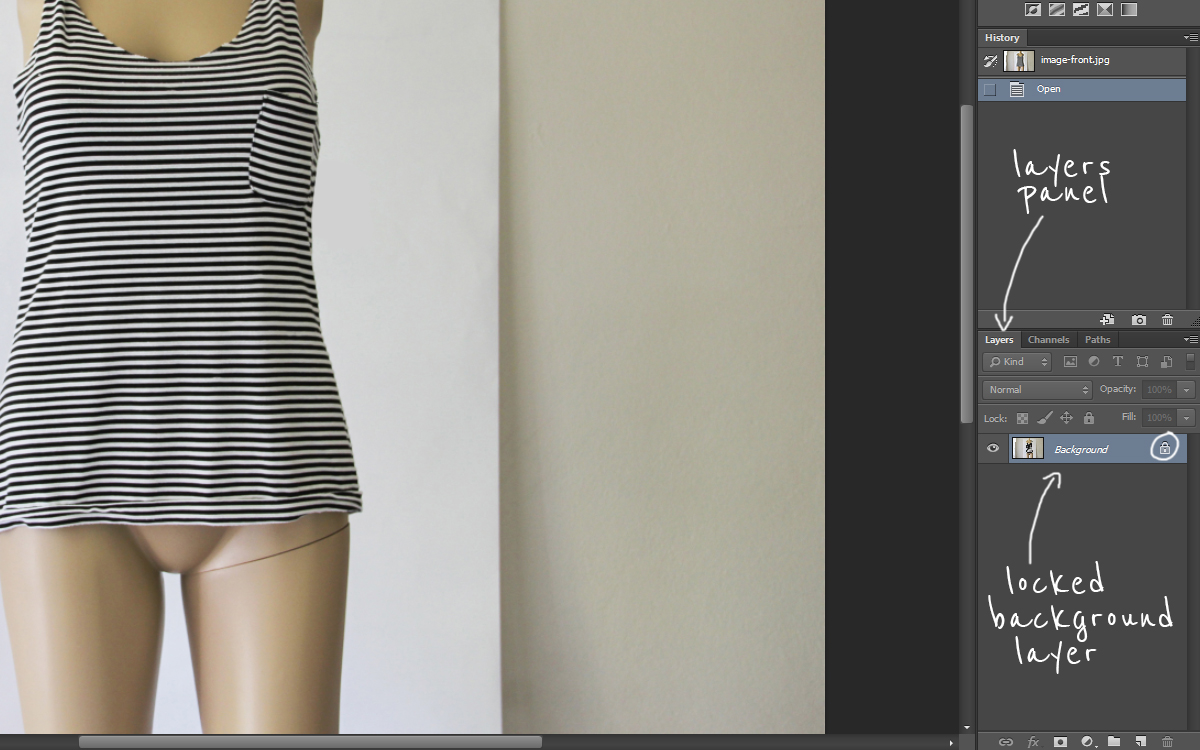
2. Unlock the background layer by clicking the lock next to it.
It’ll automatically be renamed to ‘Layer 0’. If you haven’t already, get into the habit of naming your layers when you work in Photoshop; it’s an extra step but it makes things a lot easier as the layers build up.
You can rename the layer by double-clicking on its name (make sure you click the text itself and not the entire box, otherwise, you will open the ‘Layer Style’ window).
Rename this layer ‘front’.
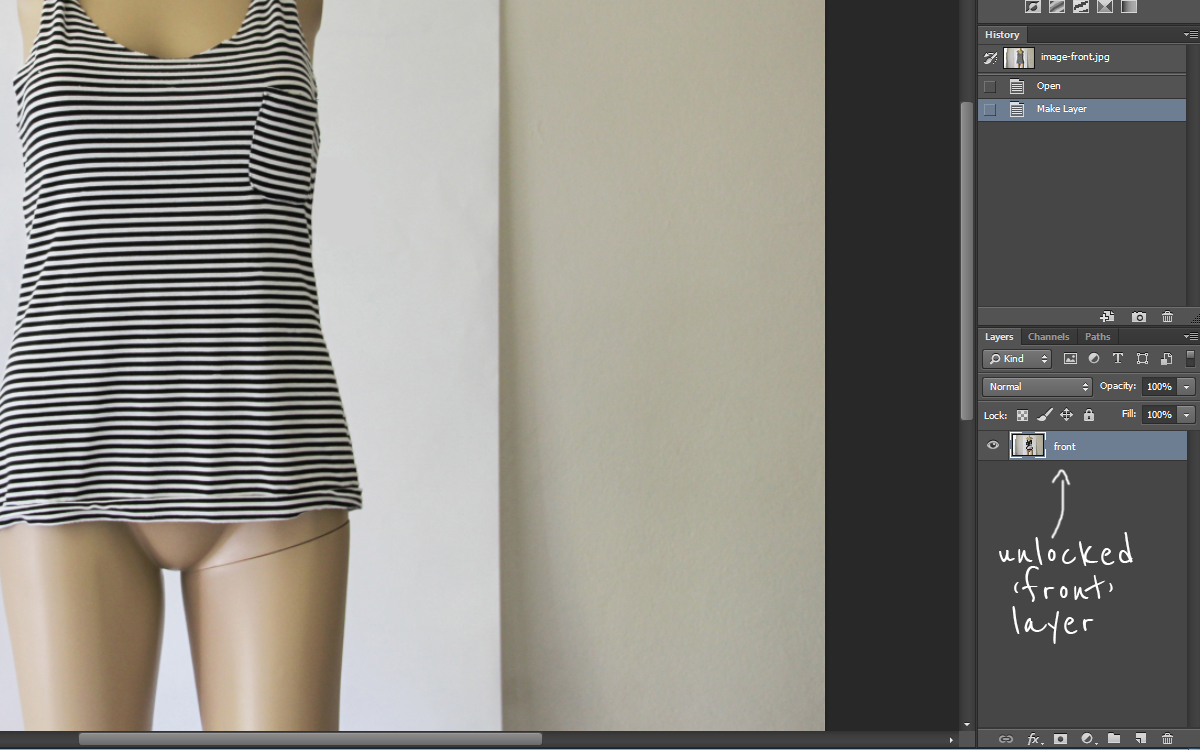
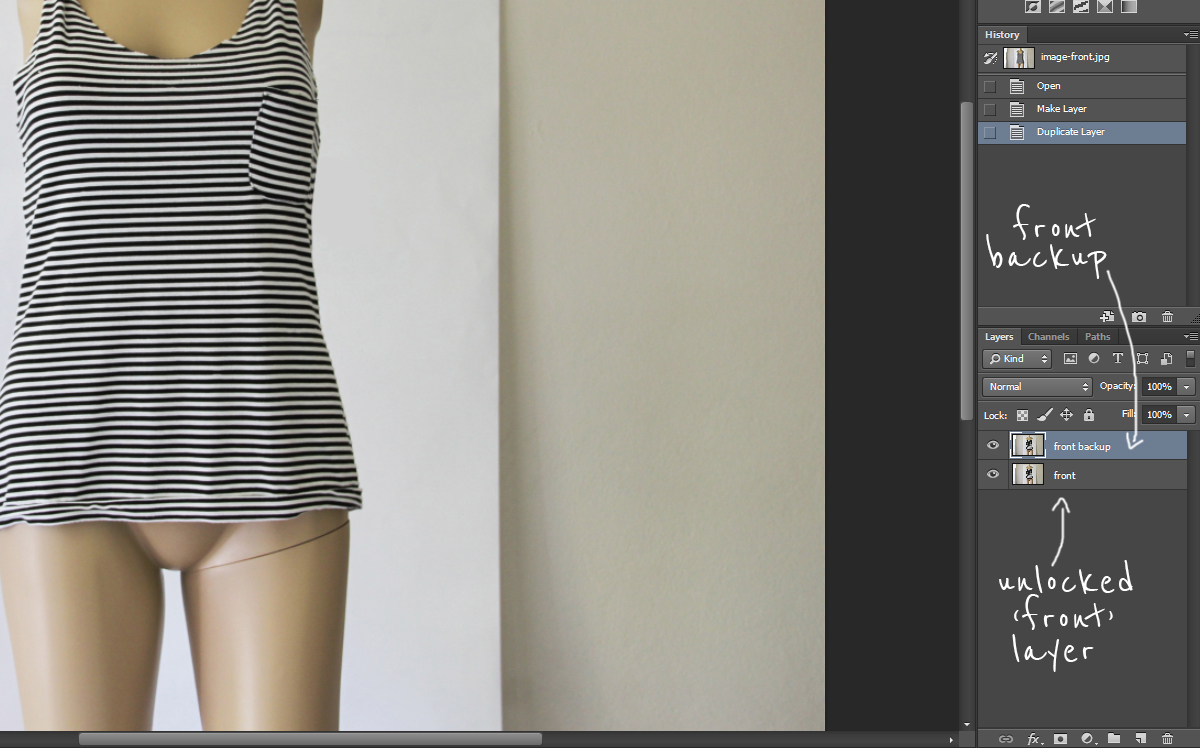
3. Right-click the layer and select ‘Duplicate Layer…’.
This is a precautionary step so you have an unmodified version of the original image in case you make a mistake.
I’d suggest naming this layer something like ‘front backup’.
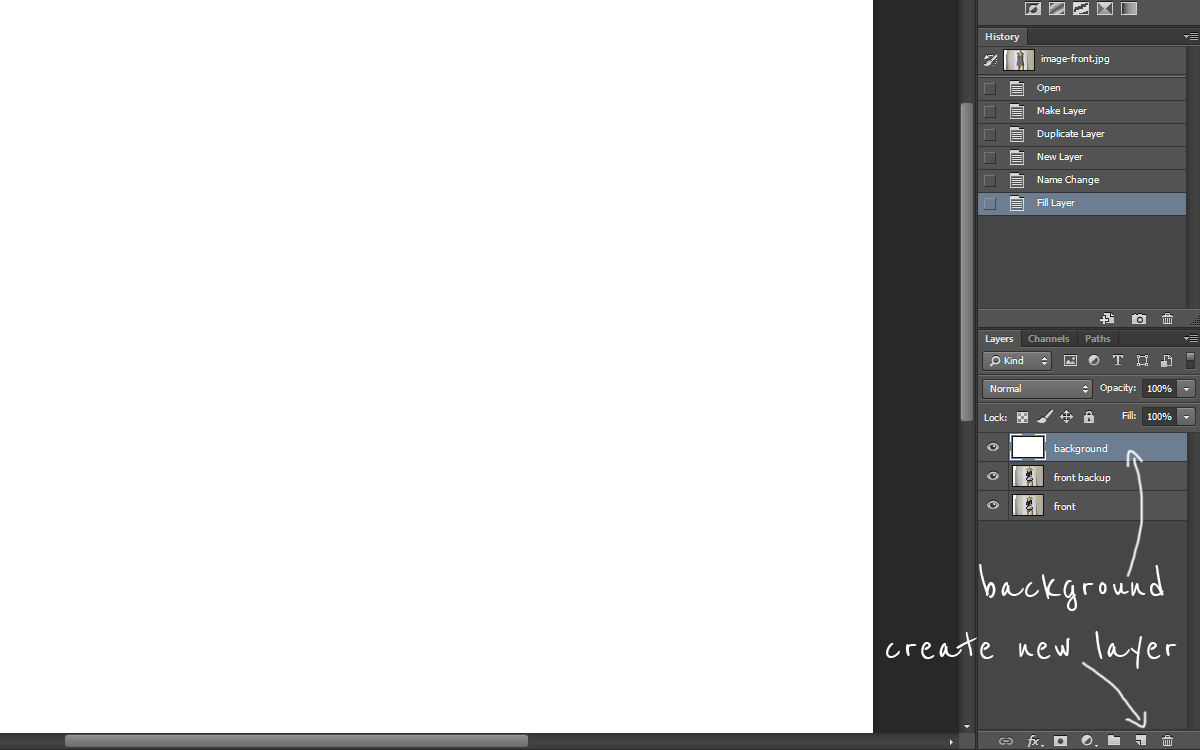
4. Create a new blank layer and name it ‘background’.
Use the paint bucket tool to fill the layer with white. This layer will be the background of the final image.
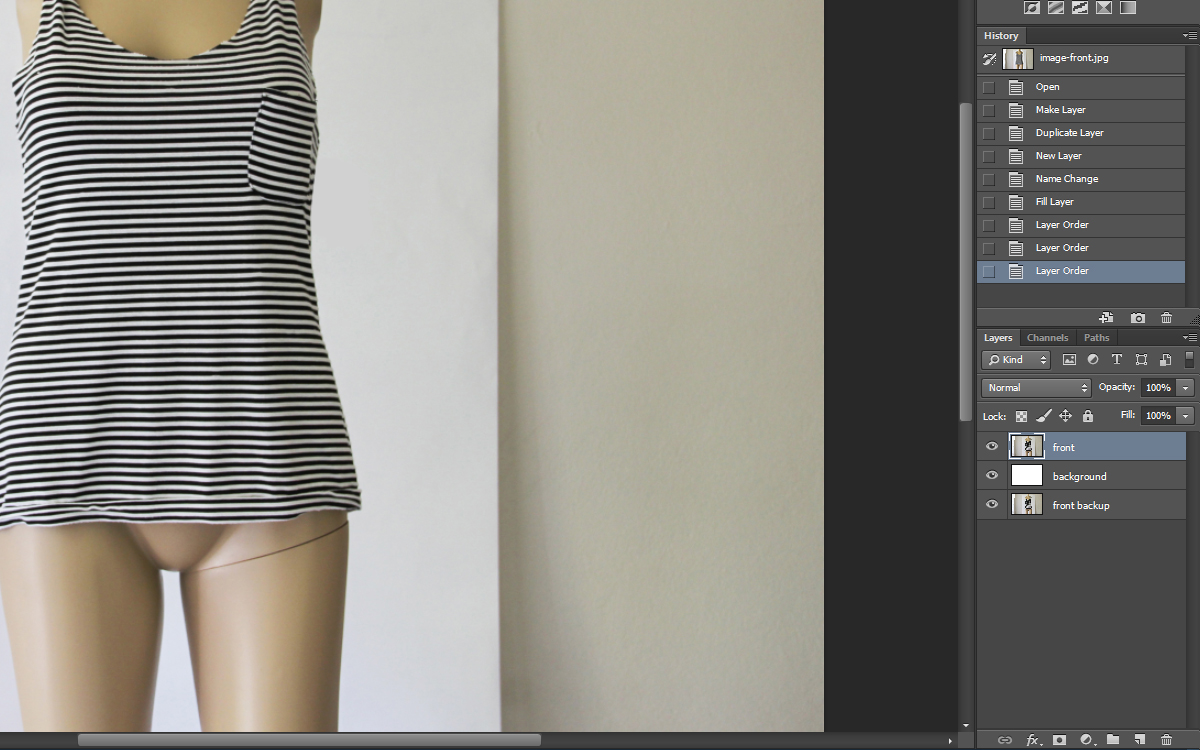
5. Reorder your layers so ‘front’ is at the top, ‘background’ is in the middle, and ‘front backup’ is at the bottom.
You can do this by clicking and dragging them up and down.
6. Now it’s time to remove the background.
Using the pen tool will give you the best results, but it does take a bit of practice to learn how it works.
Check out our blog post on how to remove the background in Photoshop if you’re not familiar with this process.
You’ll need to use the pen tool to create a path around the product on your ‘front’ layer.
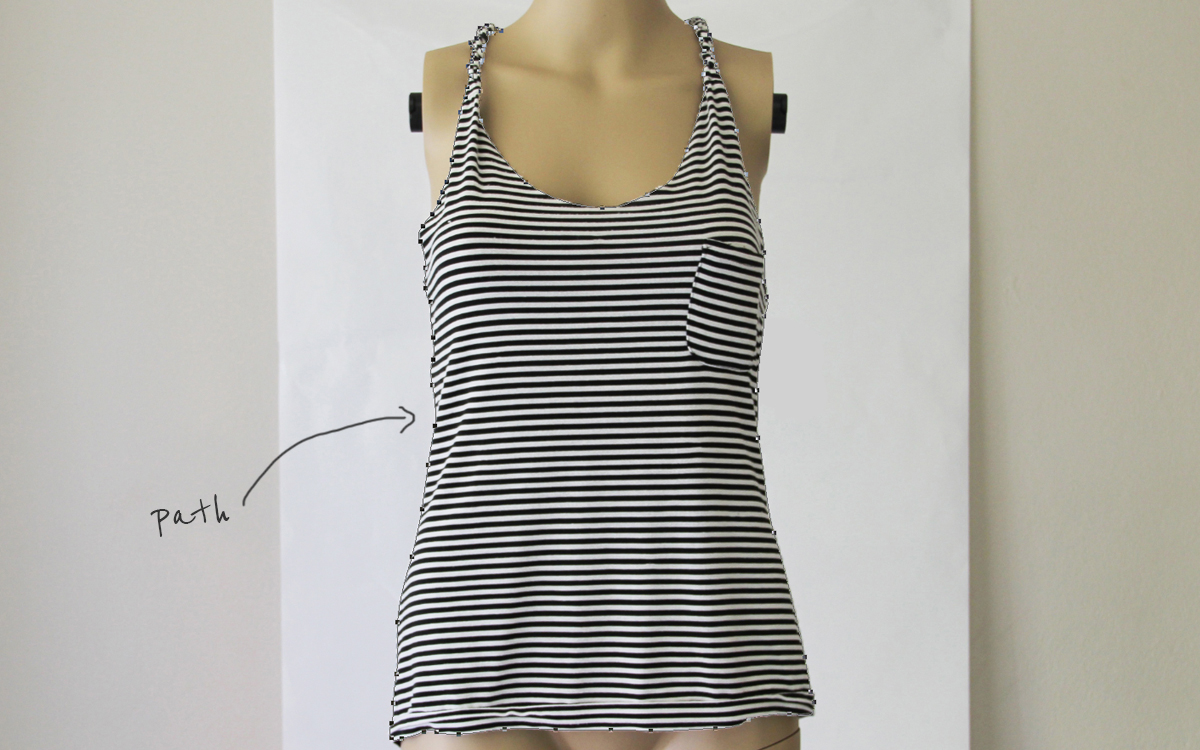
7. Click ‘Selection…’ in your top Photoshop palette and you’ll see ‘marching ants’ appear around the product.
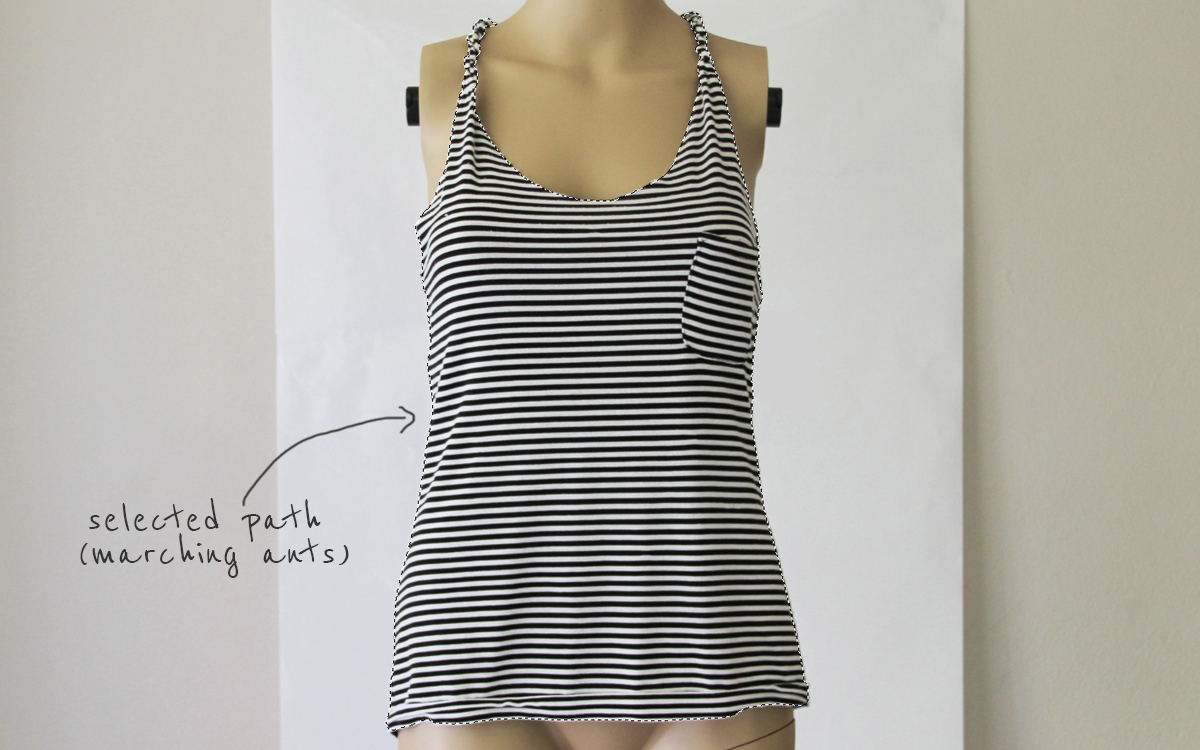
8. Go to ‘Select’ > ‘Inverse’ at the top of your Photoshop window.
The ‘marching ants’ will then be placed around the background and not the product.
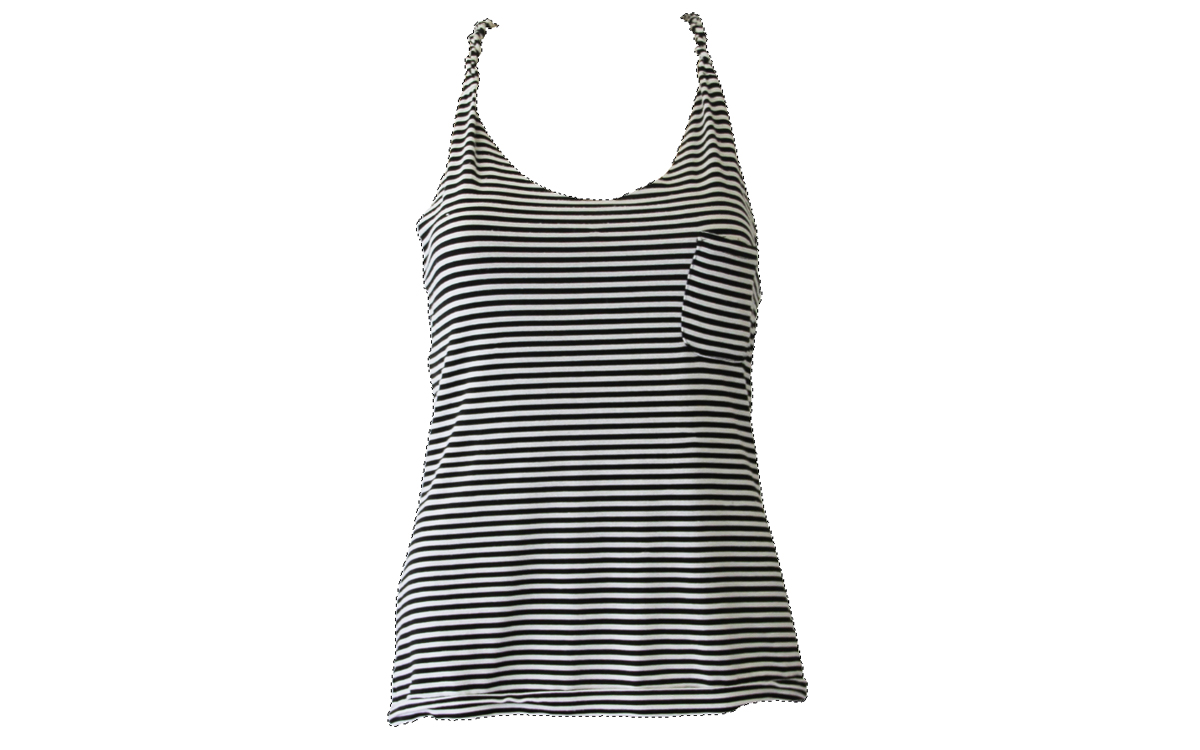
Hit ‘Delete’ on the keyboard and your product should be sitting on white; the original photo is hidden behind the white layer.
This product, by the way, is a perfect example of when a ghost mannequin effect is needed because the singlet looks awkwardly cut off at the top.
9. Open your ‘back half’ photo in Photoshop.
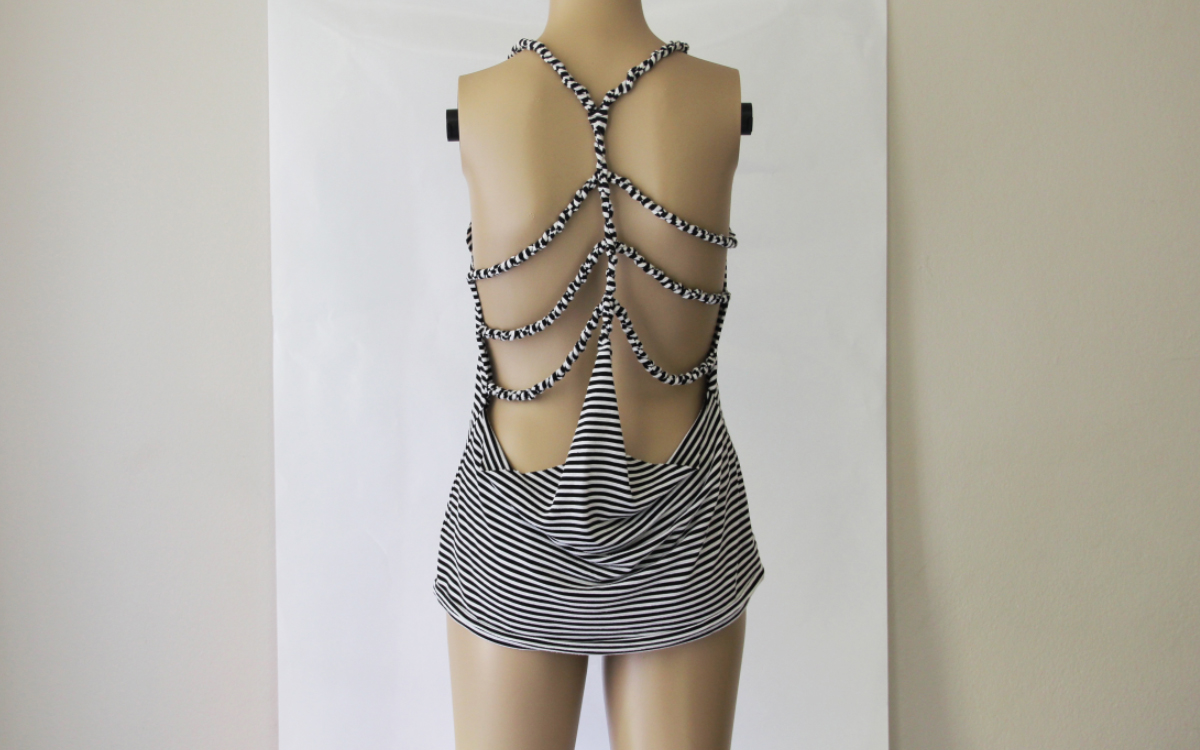
10. Repeat Steps 2 and 3 for this image, naming the layers ‘back’ and ‘back backup’ respectively. You don’t need to create a background layer.
11. Using the pen tool, create a path around the product.
12. Click ‘Selection…’ to place the ‘marching ants’ around the product.
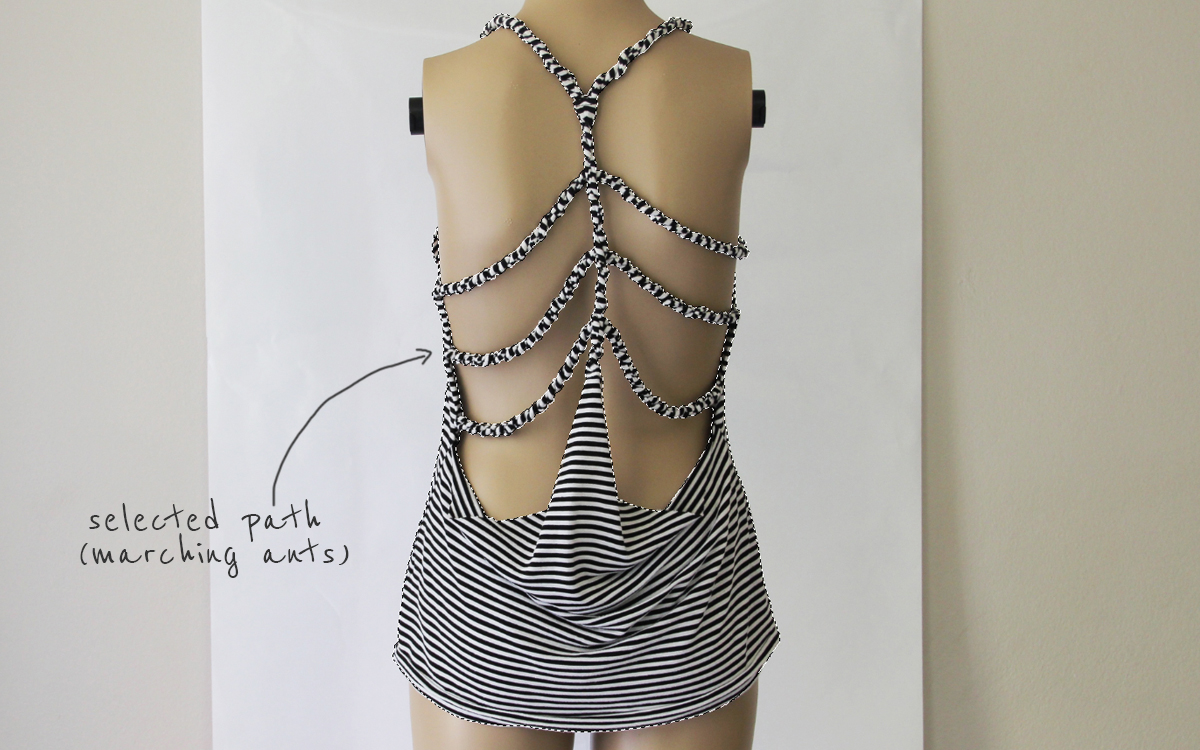
13. Hit Ctrl + C / Command + C to copy the layer.
14. Go back to your ‘front half’ and hit Control + V / Command + V to paste the layer. Reorder the layers so ‘back’ is behind ‘front’ but the white background is behind both.
15. After making sure ‘back’ is selected, move it around and resize it (hit Ctrl + T / Command + T to enable the free transform tool) until you find the best position for it.
Sometimes you may find it fits perfectly. You can also use the lasso tool to delete any bits that shouldn’t be visible.
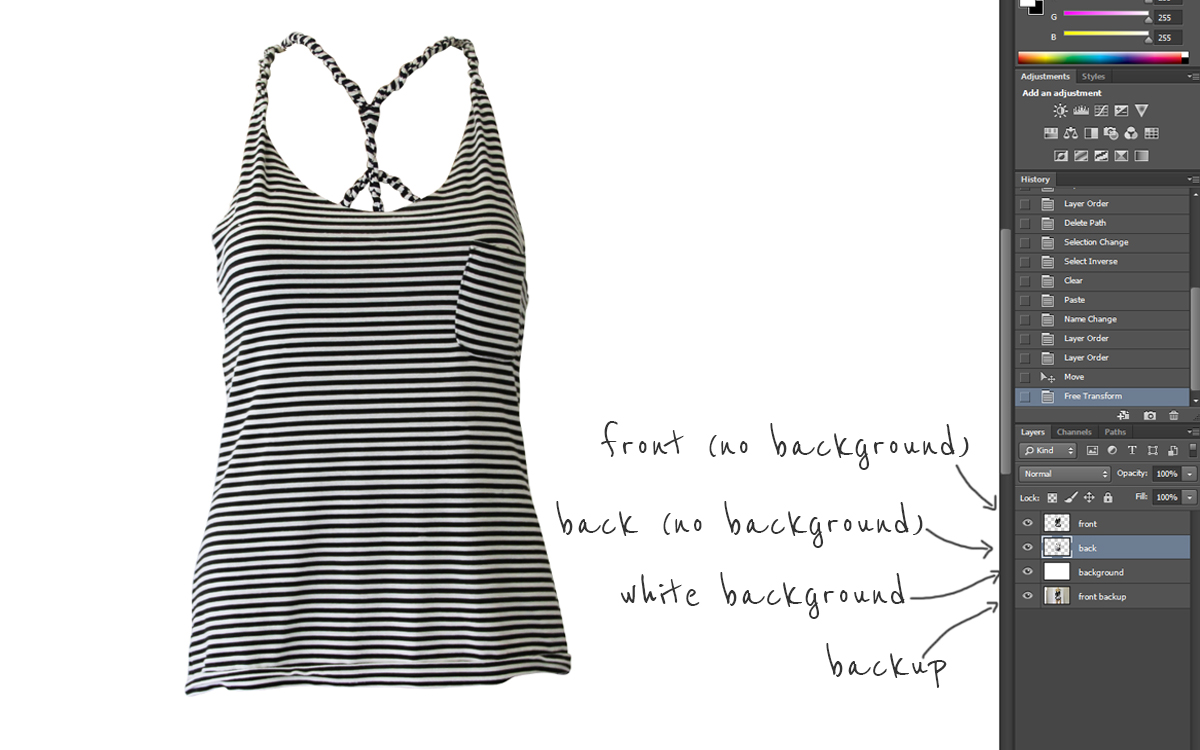
Some tips for making your ghost mannequin effect look more natural:
- Select the eraser tool and set it to brush mode with an opacity of 25%. On the neck/cuff/hem areas, use this tool to blend the front layer into the back by gradually and softly erasing it.
- Select the brush tool and set it to black (#000000) with an opacity of 15%. Use this tool to create a natural-looking shadow in the places where the front and back meet. This will make the piece look more realistic and give it some dimension.
- Just make sure you don’t overdo it! A few strokes should create a nice illusion of depth.
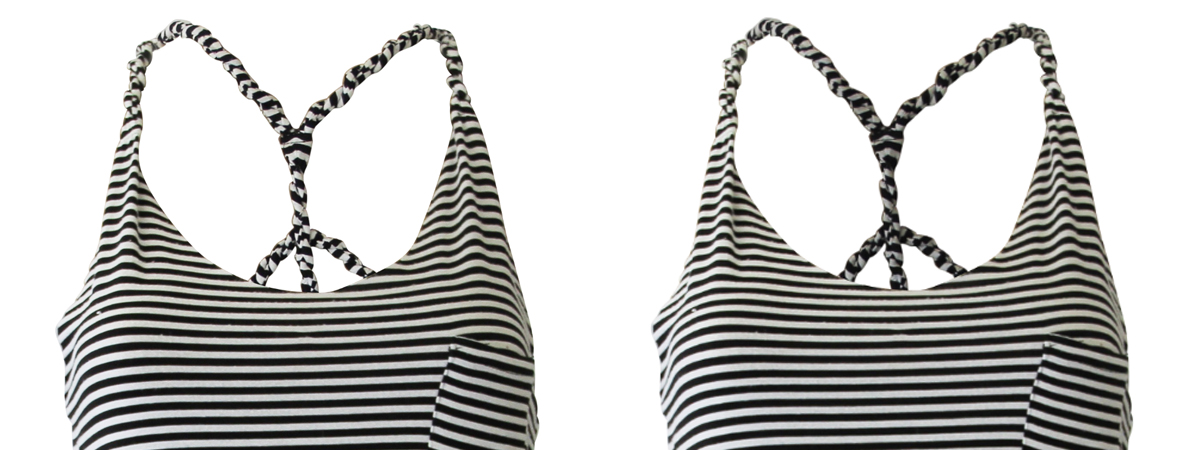
And that’s it, you’re done. You’re now a master of the ghost mannequin effect!
That’s how to create a ghost mannequin for your online store. It’s a great method and we hope this guide has helped you learn the technique.
Leave a comment below if you ever need any help!

