

Inconsistent product images, slow-loading pages, and photos that look stretched or blurry on mobile are almost always a sizing problem. The good news is that knowing how to resize images in Shopify is straightforward once you know what sizes to use and which method fits your situation.
This guide covers the recommended image dimensions for Shopify, three ways to resize your images (before uploading, inside Shopify, and using an app for large catalogs), what to watch for on mobile, and the most common mistakes to avoid.
How Shopify handles image sizes
Shopify automatically scales and serves your images through its CDN, which means visitors aren’t downloading the raw file you uploaded. Shopify delivers a version sized to fit the device and screen. That’s a good thing for performance — but it doesn’t mean the source file you upload is irrelevant, which is why how you resize an image in Shopify still decides how sharp it looks.
If you upload a low-resolution image, Shopify can’t add detail that isn’t there. You’ll get a small, blurry photo scaled up to fill the space, and no amount of CDN optimization fixes that. On the other end, uploading an enormous 8MB file means Shopify has more to work with, but it also means slower initial load times and wasted storage.
The goal is to upload images that are high enough quality to look sharp at full size, but not so large that they’re unnecessarily heavy. The sweet spot sits around 2048px on the longest side at under 1–2MB per file.
What size your Shopify images should be
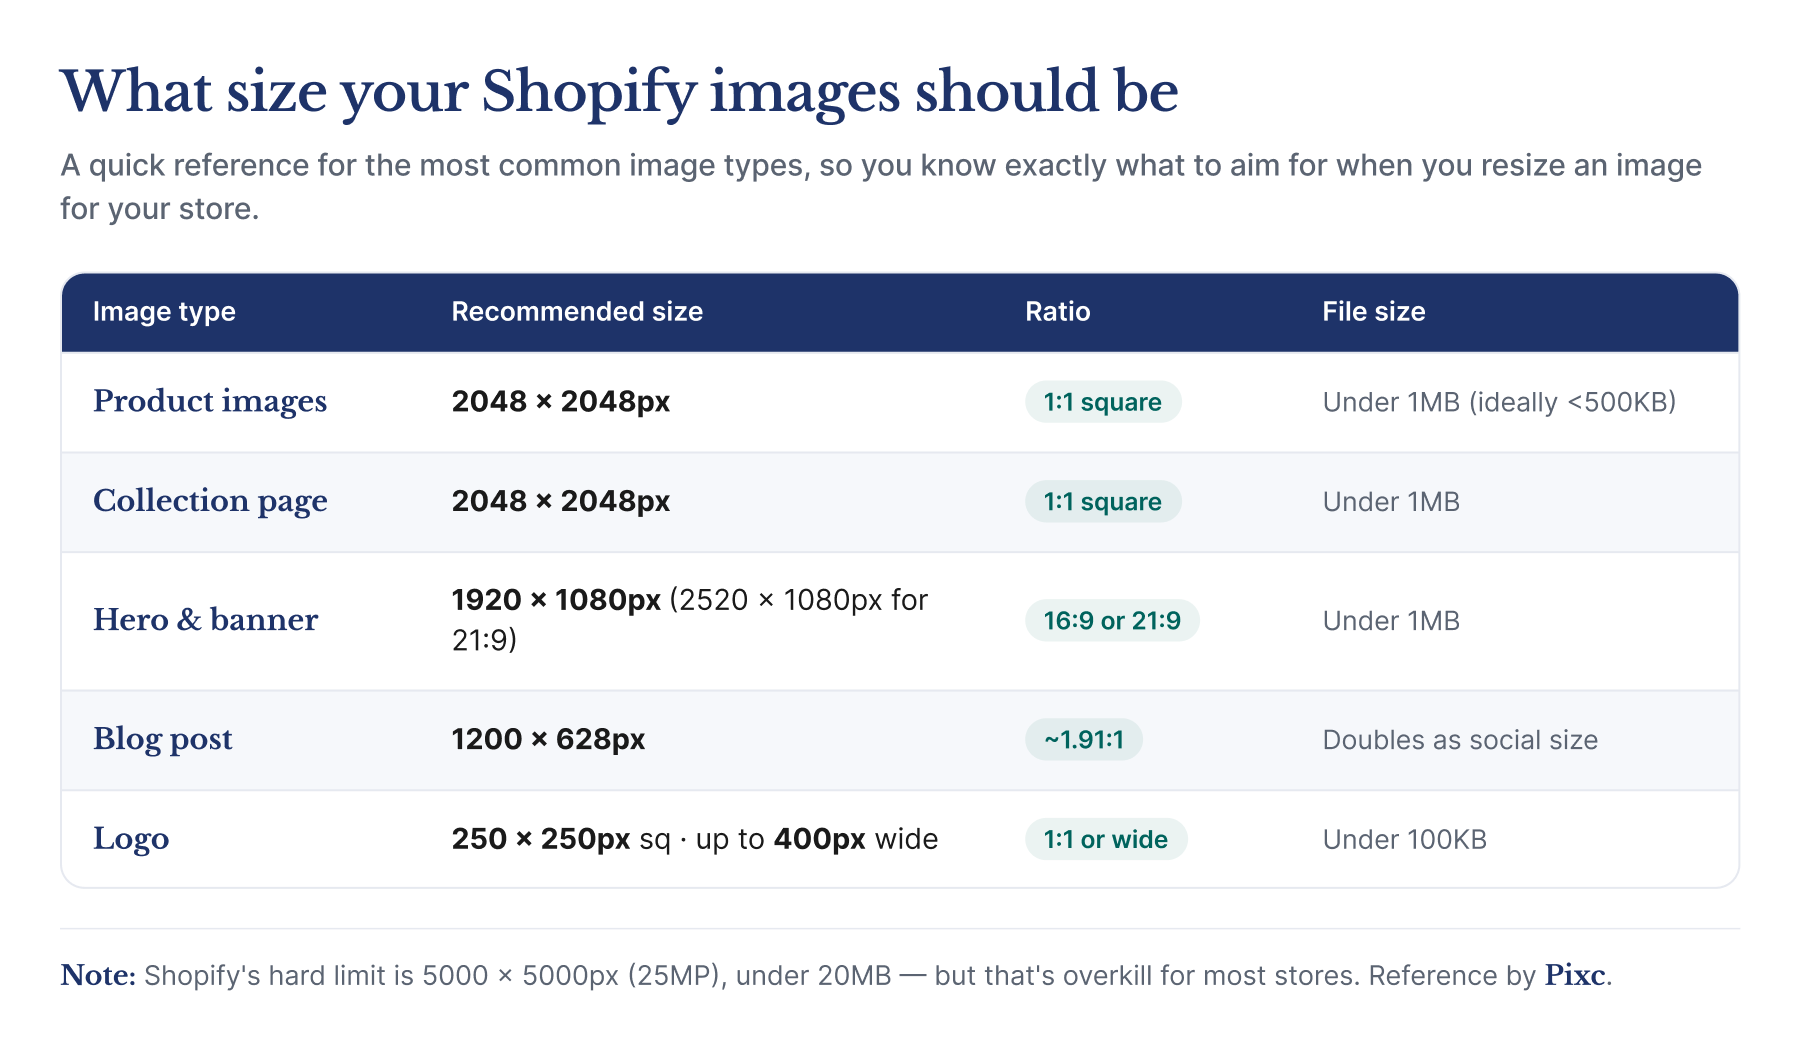
Here’s a quick reference for the most common image types, so you know exactly what to aim for when you resize an image for your Shopify store.
Product images: 2048 x 2048px is the standard recommendation. Square (1:1) is the most widely used ratio because it looks consistent across collection grids and product pages. Shopify’s hard limit is 5000 × 5000px (25 megapixels), under 20MB, but uploading images anywhere near that size is overkill for most stores. Keep file size under 1MB where possible, and ideally under 500KB for faster load times.
Collection page images: Match your product image dimensions — 2048 x 2048px at 1:1 works here too.
Hero and banner images: 1920 x 1080px (16:9) is the safe standard and looks sharp on most themes. If your theme uses full-bleed or ultra-wide layouts, go 2520 x 1080px (21:9). Either way, keep the width in the 1800–2500px range and file size under 1MB.
Blog post images: 1200 x 628px works well — it’s also the standard size for social media sharing, so the same image does double duty.
Your logo: 250 x 250px for a square logo, or up to 400px wide for a horizontal one. Keep it under 100KB.
For file format, JPEG or WebP are the right choices for product images. WebP files are smaller at the same visual quality and also support transparent backgrounds. PNG is worth using only if you need transparency and can’t use WebP. Avoid uploading HEIC files (iPhone photos) directly — convert them to JPEG or WebP first.
Method one: Resize before you upload
Resizing your images before they go into Shopify gives you the most control, and for small catalogs it’s often the simplest approach. There are free tools for every setup.
On a Mac, the built-in Preview app handles resizing without any additional software. Open your image, go to Tools > Adjust Size, enter your target dimensions, and export. On Windows, Paint does the same job under Image > Resize. Both are fine for occasional resizing.
For anyone who processes images regularly, Canva’s free plan lets you set exact pixel dimensions, and Squoosh is a browser-based tool that resizes and compresses images at the same time with a live quality preview. If you’re already in Photoshop or Lightroom, use Image > Image Size and export via Save for Web for the best file size control.
One thing to watch: always resize down, not up. Reducing a 4000px image to 2048px is fine. Enlarging a 600px image to 2048px will make it blurry. If your starting image is too small, the fix is a better source photo, not a resize.
Method two: Resize inside Shopify
Shopify has a basic built-in image editor for simple Shopify product image resize tasks that lets you crop and rotate images directly in the admin. To access it, go to Products, click into a product, click on an image, and select Edit image. From there you can crop to a specific ratio, which is useful for making a landscape photo square without leaving Shopify.
The built-in editor is limited to cropping and rotation — it doesn’t let you set specific pixel dimensions or compress file sizes. If you need more control than that, resizing before you upload or using an app will serve you better. But for quick crop adjustments on individual images, it does the job without leaving your admin.
Method three: Resize many images at once using an app
If you have a large catalog or you’re onboarding a lot of new products, trying to resize each product image in Shopify one by one becomes impractical fast. An app that handles it directly in Shopify is a much better use of your time.
Photo Resize by Pixc was built for exactly this. You install it, run a scan of your store, and it identifies which images are inconsistent in size or aspect ratio. Then, you pick the ratio you want (square, portrait, or landscape), choose which images to update, and the app resizes and replaces them directly in your store. You can also set it to automatically resize any new images you upload going forward, so your catalog stays consistent without you having to think about it.
The first 50 images are free, which is enough to test whether it works for your store before committing to a plan.
Resizing for mobile: Getting product images right on phones
More than half of Shopify store traffic comes from mobile, and product images that look fine on desktop can look noticeably off on a small screen — especially if they’re cropped badly or take too long to load. So, getting your Shopify images resized for mobile matters more than ever.
The main thing to get right for mobile is aspect ratio. A very tall portrait image can dominate the entire screen on a phone, pushing the add-to-cart button below the fold. A wide landscape image might shrink to a point where product detail is hard to see. For most stores, a square (1:1) ratio is the safest bet — it scales predictably across screen sizes and looks consistent whether someone is on desktop, a tablet, or a phone.
File size matters more on mobile than on desktop because mobile connections are less reliable. Keeping product images under 500KB means they load quickly even on slower connections. Squoosh is useful here — you can drag in an image and adjust the compression until you find the right balance between quality and file size.
Common resizing mistakes to avoid
Mistakes come up every time people resize images in Shopify, and they’re easy to avoid once you know them.
Upscaling small images is the most common mistake. If your source image is 400px wide and you resize it to 2048px, you’re not adding detail — you’re stretching what’s already there. The result is a blurry image at a bigger size. Always start with the highest quality source file available.
Inconsistent aspect ratios across your catalog make a collection page look messy and unprofessional. When product images are different shapes, the grid layout breaks and the store looks disorganized. Pick one ratio and apply it consistently.
Uploading very large files because “higher quality is better” slows your store down without meaningfully improving how images look. A 6MB JPEG uploaded to Shopify won’t make your product look better to a shopper — Shopify will scale it down anyway. What it will do is make your admin slower and your pages heavier than they need to be.
Using PNG for all product images is worth avoiding unless you genuinely need transparency. PNG files are significantly larger than JPEG or WebP at the same visual quality. For most product photos on a white or solid background, JPEG or WebP is the right format.
Resize once, then build a repeatable system
Getting your images to the right size is a one-time fix for your existing catalog, but the real win is making it automatic going forward. Whether that’s a consistent export setting in your photo editing software before you upload, or an app that handles new images as they come in, having a repeatable system means your catalog stays consistent without additional effort every time you add a product.
If you want to resize your existing product images without leaving Shopify, Photo Resize by Pixc is the fastest way to do it — start with 50 images free and see the difference.